
So the last year threw us a bit of a curve ball and we find ourselves back in Atlanta, in our old house, and I couldn't be happier or more thankful about it. We dearly miss our friends and the community in Chattanooga, but God had a different story for us. So we will be where we are and praise God each and every day for the last year we have had, though it was difficult.
In Chattanooga I didn't really have the space to do projects or anything. I did the best I could with the space we had, but now that I have a garage (aka my studio as MR.P refers to it) back I am back to doing projects, projects, and more projects!! So I would love to continue showing you how to decorate on a dime...and I apologize for the long break I have taken!
Anyway, I'll start with making a fake roman shade. I have been wanting to try this out for a really really long time. With custom roman shades costing $100-$200 this tutorial is a great budget friendly choice.
Supplies you'll need:
- scissors
- plastic blinds that will fit your window (width wise...they can be too long...mine definitely were too long)
- fabric about 2 inches wider than the blinds and 2-4 inches longer than the blinds
- fabric glue
*** and seriously, a willingness to just try it out. I put this project off for years and am kicking myself for not trying it sooner.
1. Start by taking your blinds out of the box and lay them out. These blinds cost $5 at Home Depot. I had no idea they were so cheap.

2. Then find the ladder cord holding all your blinds in one spot. You are going to cut this cord. My blinds had 3 of them. Don't cut the thicker cord. That one is what pulls your blinds up and down. (please note my spray painted fingers)

3.) Then on the bottom of your blinds you are going to see 3 little button type things which you will pop off. Untie the thick cord that pulls the blinds up and down. Then take off all the blinds except for the last few. I left 5. I wish I had only left 4 because then my folds would have been much thicker. Oh well. So once I had my 5 left I put the bottom of the blinds back on. Measure your window and make sure it's exactly the same height as the bottom of your blinds.

4.) I measured then marked my fabric with a sharpie so that I put the blinds in the exact spot (7 inches apart from each one). I'll add this. I did mess up and my bottom one was not 7 inches apart from the 2nd to last one. What I should have done was take the length of my blinds and the number of folds and divided it which would have given me the perfect spacing for my folds and completely taken away one of my blinds. I'll definitely do this next time.
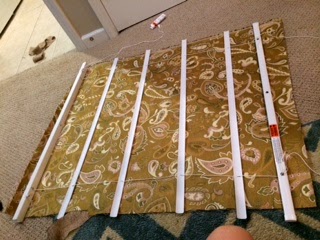
5.) My fabric wasn't wide enough so I knew that my blinds would need a trim to cover it all up. Anyway, you just glue yours down on the back. I've seen some people iron it all down. It's not really going to show so I wouldn't worry about it. AND if this is a roman shade for a window in the front of your house then you can get some white liner and just glue it to the back. That I would definitely iron down and make look nice so your house looks pretty from the outside. The glue takes a few hours to dry so leave it alone. And don't let your 3 year old walk all over it or anything.

6.) Then have your handsome husband and cute little stinker help put up the hardware. I really need to learn to use the drill, but I'm afraid I'm going to break the bit off in the wall. So I make MR.P do it.

Then voila!! You're all done! I'm so so glad I tried this. Our kitchen window has needed a little love and some privacy for a long time. Now it has it!! I'm sorry that my pictures aren't perfect. Life is easy with an iphone so that's what I use to capture life :)

I hope this helps! Let me know if you have any questions. I would be happy to answer if I can!
2 comments:
Great job! I think the end result looks really great. I love your choice of fabric too. Roman shades are really stunning. I think it's a great idea patterning them from your original pull up shades to reduce much of your work. Anyway, it looks like having to move back to Atlanta isn't too bad after all, since you get to be with your friends. I'm sure things will get better soon. Thanks for sharing!
Taylor Allen @ Sunburst Shutters Arizona
It’s great that you are back in your old house with a space for projects.
Post a Comment